- Go to the root of the site >> "Site Actions" >> "View All Site Content"
- Click "Create"
- Click "Custom List"
- Type in a name for the new list, e.g. "File Keywords", and select "No" to exclude it from the Quick Launch. Click the "Create" button to save the list.
- Add the items to your list.
- Go to the root of the site >> "Site Actions" >> "Site Settings" >> "Modify All Site Settings" >> "Site Columns"
- Click "Create" to create a new Column.
- Type in a name for the new Column, e.g. "File Keywords"
- Select "Lookup" as the Type.
- Select "File Keywords" from the "Get information from" drop down list.
- Select "Title" from the "In this column" drop down list.
- Tick the "Allow multiple values" checkbox to allow more than one value to be chosen.
- Go back to "Site Settings", and select "Site Content Types"
- Select the Content Type you wish to add your new column to.
- Click the "Add from existing site columns" link
- Choose your new Column from the "Available Columns" list and click the "Add Button".
- Click "OK" to assign the new Column to the Content Type.
- If you now go to the "Edit Properties" screen for an item of the changed content type, your new column will appear:

- To now configure the new column to be included in the site's Search, go to Central Administration, then select the Shared Service.
- Under "Search" click on "Search settings"
- Click on "Metadata property mappings"
- Click on "New Managed Property"
- Type in a Property Name of "FileKeywords"
- Select "Text"
- Click the "Add Mapping" button
- Search for part of your column name, e.g. "keyword". The item will probably be called "ows_File_x0020_Keywords"
- Tick the "Allow this property to be used in scopes"
- Click "OK" to save the changes.
- Navigate to your Search page, and click on "Advanced Search".
- Go to "Site Actions" >> "Edit Page"
- On the "Advanced Search Box" web part, go to "Edit" >> "Modify Shared Web Part"
- Under "Properties", edit the "Properties" attribute which contains the XML schema.
- Under the "All Results" node, add a new "PropertyRef" node titled "FileKeywords".
- Under the "PropertyDefs", add a new "PropertyDef" node with a Name of "FileKeywords", DataType of "text" and DisplayName of "File Keywords":

- Save the changes to the web part
- Publish the "Advanced Search" page, and you should now be able to search on your new column from the Advanced Search, within the "Add Property Restrictions" section, and by performing a normal search of: FileKeywords:"keyword"
- Results may not be displayed straight away in the Search - you might need to wait until the next search crawl.
Thursday, 15 January 2009
Adding a Lookup List column to a SharePoint Content Type and adding this new Lookup List to the site's Search
In SharePoint, if you want to add a new field to a Content Type, for example a Lookup List of data from a List within SharePoint itself, and also search on this Field from the Advanced Search screen, follow these steps:


Monday, 12 January 2009
Using SPUtility.MapToIcon to retrieve an item's icon based on the item type
In a SharePoint web part project, when you need to display an item's icon based on it's item type, "SPUtility.MapToIcon" can be used to return the item's icon:
SPUtility.MapToIcon(SPContext.Current.Web, zItemURL, string.Empty, IconSize.Size16)
Pass in the item's URL (or file extension) and "MapToIcon" returns a string value of the icon for that file extension, based on the icon specified in "C:\Program Files\Common Files\Microsoft Shared\web server extensions\12\TEMPLATE\XML\DOCICON.xml". The icon file needs to reside in the folder "C:\Program Files\Common Files\Microsoft Shared\web server extensions\12\TEMPLATE\IMAGES".
e.g.
zImageUrl = "/_layouts/images/" + SPUtility.MapToIcon(SPContext.Current.Web, zItemURL, string.Empty, IconSize.Size16)
Thursday, 8 January 2009
Adding a "Home" link to the "My Site" personal and private pages
If you need to add a tab on the "My Site" pages, to allow the user to return to the root SharePoint web site, try the following:

- Navigate to the SharePoint Administration site
- Select the Shared Service
- From the Shared Services page, select the "Personalisation site links" link from the "User Profiles and My Sites" heading.
- Click the "New" button and select to add a "New Item".
- In the URL field, type in "http://ServerName/_layouts/redirectpage.aspx?Target=/pages/" - this will use SharePoint’s redirect page to redirect the user to the default page in the "Pages" folder (the Home page). The redirect page MUST be used, otherwise the page links back in a different way and you get different menus on the home page.
- Enter a description of "Home"
- Enter your current user name as the "Owner"
- Click "OK". The link will now appear whenever a user navigates to their "My Site" area. There doesn’t appear to be a way to re-order the tabs on the "My Site" area, however please let me know if you do find a solution!

Changing the logo on the "My Site" personal and private pages
In SharePoint, there doesn't appear to be an obvious or simple approach to setting the "My Site" personal and private pages to inherit the logo from the root SharePoint site.
The way I found to do this was to simply overwrite the "mysite_titlegraphic.gif" file in the folder "C:\Program Files\Common Files\Microsoft Shared\Web Server Extensions\12\TEMPLATE\IMAGES" on the server with the logo of my choice.
The way I found to do this was to simply overwrite the "mysite_titlegraphic.gif" file in the folder "C:\Program Files\Common Files\Microsoft Shared\Web Server Extensions\12\TEMPLATE\IMAGES" on the server with the logo of my choice.
Remote debugging a SharePoint 2007 web part using Visual Studio 2008
During a recent development project, I had a need to create a web part in C# .NET for use with SharePoint 2007.
When developing the web part, it was necessary to work out how to do remote debugging so I could work out why the web part wouldn't always work.
This post details how I managed to configure remote debugging of a web part project using Visual Studio 2008, connected to a development server running SharePoint 2007.

Problems that you may encounter:
When developing the web part, it was necessary to work out how to do remote debugging so I could work out why the web part wouldn't always work.
This post details how I managed to configure remote debugging of a web part project using Visual Studio 2008, connected to a development server running SharePoint 2007.
- Firstly, open up your web part project within Visual Studio 2008 on your client PC.
- Establish a Remote Desktop Connection to your server, logging in with the same account that you are using on the client PC.
- Copy the following folder from your client PC to the server: “C:\Program Files\Microsoft Visual Studio 9.0\Common7\IDE\Remote Debugger\x86”. This folder contains the "Visual Studio Remote Debugging Monitor".
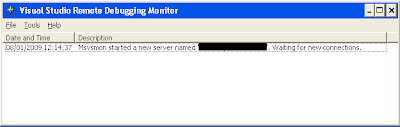
- On the server, load "msvsmon.exe" from the "x86" folder that was just copied. The Remote Debugging application will load, and display the message "Msvsmon started a new server named 'DOMAIN\UserName@ServerName'. Waiting for new connections." Make a note of the value of 'DOMAIN\UserName@ServerName', as this will be needed in step 16 below.
- On the server, share the folder "C:\Inetpub\wwwroot\wss\VirtualDirectories\80\bin" (where "80" is the port number of the application where your web part resides), giving "Change" permissions to the user account you're using on the client PC.
- In Visual Studio, view the Properties of the project, and select the "Build" tab.
- Change the "Output path" to "\\ServerName\bin\".
- Build the project. The project's DLL will be published straight to the server.
- On the client PC, go to "Control Panel" >> "Administrative Tools" >> "Component Services".
- Expand "Component Services" >> "Computers", and right-click on "My Computer". Select "Properties".
- On the "My Computer Properties" window, select the "COM Security" tab.
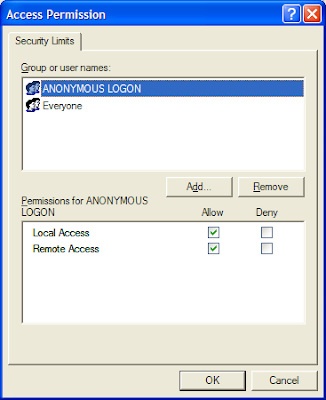
- Click on the "Edit Limits" button within the "Access Permissions" section.
- Tick the "Allow" check box for "Anonymous Logon" to allow the server to connect to the client PC.
- Repeat steps 9 to 13 on the server.
- In Visual Studio, go to the "Debug" menu and select "Attach to Process".
- In the "Qualifier" field, type in the value that was noted in step 4 above.
- Tick the "Show processes from all users" check box. This should establish a connection to the server, and display a list of the running processes.
- Select all the "w3wp.exe" processes in the list, and click on the "Attach" button.
- Visual Studio should enter debug mode.
- Load up the SharePoint page in Internet Explorer that contains the web part you wish to debug. You should now be able to set breakpoints in your code and debug your web part!


Problems that you may encounter:
- If you have a firewall enabled either on the client PC or server, this may prevent the remote debugging from working. Doing a quick Google search should indicate the necessary ports that need to be opened for remote debugging to work successfully.
- If none of the breakpoints are hit (i.e. Visual Studio says that there are no symbols loaded), then it could be that SharePoint is using the DLL from the "C:\Windows\Assembly" folder, if the DLL was also placed in there, instead of the version in the "Bin" folder. Remove the DLL from the "Assembly" folder and re-add the Web-part in to SharePoint from the "Web Part Gallery: New Web Parts" page to ensure it uses the version from the "Bin" folder.
- Before the web part can be successfully used in SharePoint, it needs to be registered as "safe". This involves adding a "SafeControl" element to the site's "web.config" file, e.g:
<safecontrol assembly="MyWebPart, Version=1.2.0.0, Culture=neutral,
PublicKeyToken=3a2f5d5fb2a8e87a" namespace="MyWebPart" typename="*" safe="True">
In the web.config file, find the "trust" element, it should look like this:
<trust level="WSS_Medium" originurl="">
If you are using "WSS_Medium", load the "WSS_Medium" config file. The default location for this on the server should be "C:\Program Files\Common Files\Microsoft Shared\Web Server Extensions\12\config\wss_mediumtrust.config".
In the "wss_mediumtrust.config" file, add the section below highlighted in bold:
<CodeGroup
class="FirstMatchCodeGroup"
version="1"
PermissionSetName="Nothing">
<IMembershipCondition
class="AllMembershipCondition"
version="1"
/>
<CodeGroup
class="UnionCodeGroup"
version="1"
PermissionSetName="FullTrust"
Name="MyWebPart"
Description="This code group grants the MyWebPart.dll full trust">
<IMembershipCondition
class="StrongNameMembershipCondition" version="1"
PublicKeyBlob="002400000489f292a49ba90dfd94fc8"
/>
</CodeGroup>
<CodeGroup
class="UnionCodeGroup"
version="1"
PermissionSetName="FullTrust">
<IMembershipCondition
class="UrlMembershipCondition"
version="1"
Url="$AppDirUrl$/_app_bin/*" />
</CodeGroup>
To get the "PublicKeyBlob" or "PublicKeyToken" values, you'll need to use the "sn.exe" tool, usually found within "C:\Program Files\Microsoft Visual Studio 8\SDK\v2.0\Bin" on the client PC:
sn.exe –Tp \\ServerName\bin\MyWebPart.dll
This will list the "PublicKeyBlob" and "PublicKeyToken" values for the DLL.
Subscribe to:
Posts (Atom)

